Saturday, January 23, 2010

It had to be difficult at some point...

I actually got this work finished last Sunday, but have been so distracted that I haven't been able to get the post up all week. I steadily feel this project coming to a close. In my last blog I had done most of the work on the couch without mistake. The main piece of fabric that went on the couch didn't really want to cooperate though. So it was definitely the most frustrating piece of I had to put on. I even got so mad I had to quit, do something else for a bit, and then return.

One thing I do have to say is the compressor, while awesome, does have a downside... When you staple with a compressor and it's heavy duty staples, they aren't coming back out. So it really doesn't lend itself to mistakes very well. For a first time upholsterer, that proved unwise on one piece. I was doing so well! But when I tackled the middle piece I stapled prematurely and it resulted in a giant problem for me to try and work around. I kept at it and definitely prevailed.

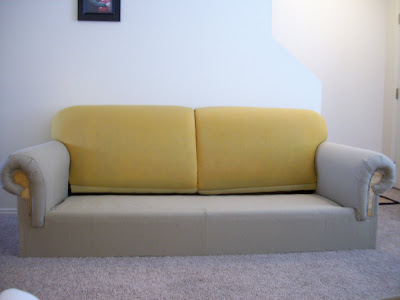
After the middle piece was on, then I just had to put the back of the couch on, followed by the cover along the bottom of the couch. Both of those pieces were giant and square, so I didn't feel they would be too difficult (and was right). Here are some pictures of my latest and greatest steps!


A few bits of advice from these few pieces:

1-Get complicated fabric placed before you staple
I can't tell you how much I really wish I would have done this!

2-Staple low on the wood
What does this even mean? Well, when I would be putting on a piece of fabric, I'd pull it around and staple it pretty close to the edge of the wood as soon as I reached it. This isn't wise because if you pull the fabric farther across the wood and then staple, it makes it easier to cover the staples with whatever piece will be serving at the "finished edge".

On the back of the couch, I had to pull the fabric as far as I possibly could to get it to the very, very edge of the wood so that it covered the stapling from previous pieces. Had I been more generous earlier with these parts, it would have been less complicated. I'm not sure if this makes sense to the general reader... but if you start upholstering, I think you will see exactly what I mean.

Basically its like wrapping a present. Have you ever cut the sides a little too short and when you went to fold them, part of the present showed through the side? That same concept, except you don't necessarily see the couch frame, but all of your staples that should be underneath.

3-Clean tools are a good idea
One of my favorite parts of the couch was using the tack strips to create the finished edge on the back of the couch. You poke it through the fabric and roll it to create a nice edge and use a rubble mallet to hammer it in. Quite easy, quite fun. The rubber mallet I was using was a touch dirty. I didn't even stop to think about that! So after a few hits, I noticed the fabric was getting dirty. :( So then I tied some scrap fabric around it and continued, this time with no dirty rub off.

Just a few things left and I'll be through! I need to sew the cushions and pillows, then figure out what I'm doing with the front of the arm rests... The light is at the end of the tunnel and I'm definitely excited to be done with this project and move onto some other creative ideas I have.

To learning from your mistakes,

Boomba
Monday, January 11, 2010

Steady, As She Goes...

This was a rather productive weekend in the world of reupholstering. After I got the arm rests on, the next few pieces proved to be quite easy. I did make my first mistake... but hopefully when I'm finished it won't be that noticeable. Here are some pictures of the progress...


Bottom center piece in


View of one side piece (I do have both of them complete)


After I finished getting those three pieces on, then I painted the legs of the couch. Before they were covered by the skirt and couldn't be seen, but I think they will be visible now. Of course I painted them black... it's the only color of paint I have. (which is why it will match everything else)

To making it over the hill and enjoying the decline,

Boomba

Saturday, January 9, 2010

Power Tools = Dangerous + FUN

Whenever I hear someone talk about "adult toys", I'll always think of power tools! Today I have successfully made small progress on the couch. Sorry if you were expecting a completed product in this blog!

My last blog was exactly a month ago when I sewed all the fabric together for the couch. A lovely friend of mine, Jack, loaned me his Porter Cable compressor staple gun so that I could do my upholstery. I had it right around the time of my last blog and actually did try to start on the couch. Unfortunately, the air relief valve had rusted and I couldn't turn it. So to avoid from blowing up, I waited to start the couch.

Jack has two jobs, so he is insanely busy! On a free night he came to check out the compressor and figured out which part he would need. I returned it to him and he had it fixed that night. Today I tested her out for the first time... and she works like a charm!


Great shot of her, but it isn't even my favorite part...


Say hello to my little friend!

I recommend to anyone starting an upholstery project to see if they can get their hands on one of these set ups. It makes everything soooo.... easy! I did have to go buy staples at Lowe's. The compressor came with staples that were 1 inch in length, but the staples I removed from the couch were closer to 1/2 inch. I got a pack of 5000 5/8 inch staples. Hopefully I don't have to go buy another box!

On a more serious note, do take the safety precautions needed with "toys" like this. I for sure got safety glasses and earplugs for this project. You'll also want to make sure you read through all instruction manuals for the tool you are using. I was really intimidated to use it at first, but once I got going I realized how easy it was. Then it just got to be more and more fun!


The first thing on the agenda was to make the proper repairs to the couch. I had three things to do. Each side needed a wooden piece along the bottom so that I could get a nice straight line when I folded the fabric under. This was necessary because I'm not putting the skirt back on.


Before


After

The next repair I needed to make was to the splitting frame on the back of the couch. I bought a piece of wood to staple to the top in order to help reinforce the beam and hopefully prevent it from splitting further.


Before


After

The staple gun made it so easy to attach these to the frame of the couch. I tried nailing the pieces when I first got them and... well... I'm a terrible aim with a hammer so that didn't turn out very well!

After the repairs were made I moved on to attach the arm rests to the couch. When I cut all the fabric out, I cut it in square dimensions. That way if I ripped anything I'd still be ok and have enough fabric. So as I started to attach the arm rests, I had to keep my scissors handy so I could cut the pieces to fit around the frame. This was only necessary on two parts of the arm rest, which was nice because it's kind of a hassle! As a note, none of this was actually hard. The hardest part was just making sure everything looked straight and that I was pulling all of the ripples out of the fabric.

Make sure you pull the fabric taut, but not too tight. You don't want anything to rip if people sit on it. Also, make sure you iron your fabric before you put it on in order to eliminate any wrinkles. You also want to iron each piece right before you are going to be putting it on. I ironed everything at once to start with. Needless to say, I'm ironing each piece before I put it on again.


There you have it! I'm feeling really good about my ability to get this couch together again. The longer I saw it sit there uncovered, the more I wondered if I could even put it back together.

To adult toys that make you smile,
(power tools)

Boomba