Monday, August 15, 2011

Baseboards!!!!

So.... my house has been baseboard-less ever since I have moved in. I got a little demo happy when we started tearing stuff apart June 2010. I've been working my way to the baseboards for quite some time. Now that the doors and casings were up, it was time to start working on the trim!
Before: Hallway without any trim or a return air vent.
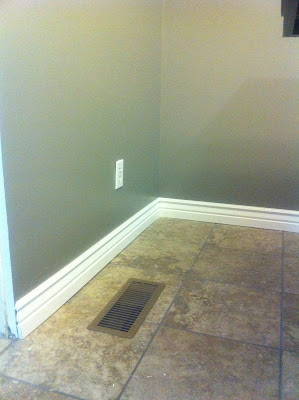
After: Baseboards up and the return air vent is in. Looks SOOOO much better.
Rather than cutting the corners at 45 degrees and putting them together, I opted to use my coping saw. While I was originally rather intimidated by this process, it ended up being really easy! If you use your saw to taper the end at a 45 degree angle, then the white primed MDF boards will have he exact line that you will need to cope. This saved me from having to draw on every piece. My corners look amazing in case you were wondering!
Baseboards really just finish the look of a room. I'm excited to have another part of the living room taken care of.
Kitchen before the baseboards were up
Another before shot
After! PS, the corners that point out like this are a royal pain. I wish I could figure out a way to use my coping saw for those too!
After :) Looks way better!

For me, I preferred to paint my trim, then cut it with the miter saw and immediately hang it with Reba. Once the painting is taken care of, then it is really easy to get the trim up and looking fantastic! I had been cutting then painting with the casings, but this was a way easier order of operations.

To some finishing touches,

Boomba

Saturday, August 13, 2011

A Shade Cooler

Back in April I decided to start getting window shades for the rest of the house. I had finally gotten curtains in the living room, but really needed them in the bedrooms upstairs. I still have broken central air and needed to start blocking out the light to help keep things cool as it would begin to get warm in the summer. Lucky for me, this summer hasn't been terrible.

Around this time, I had gone to Jack and Stef's condo and they had some really nice panel curtains from IKEA. I just really liked the look that they had. So, I went down to IKEA to get the panel system. After two trips and spending $345, I had everything I needed to block some sunlight from my bedrooms. While it seems expensive... I got six windows out of it.

Putting together the panel system from IKEA was time consuming, but once I realized the best order of operations, it made things go by much quicker! One thing that I enjoy about buying IKEA products is that all of the packaging is recyclable. So I was able to recycle most of the stuff :)


Office window panel


Both windows in the office


Windows in the master bedroom

I also did the window in the second bedroom and the bathroom. I really enjoy the look of them and have the fabric to do more window panels for the addition when I get that far in the house. The project did take a full weekend, but really I was glad to cover up my ugly windows :)

To beating the heat,

Boomba

Friday, August 5, 2011

Casing Out My Place

So I mentioned in my last post that I had gotten a lot of things done at my house. One of the reasons that I hadn't been posting about them is because I'd already written about the start of the projects. In my post I'm Not Dead! and A Little Privacy Please... I showed everyone my progress on getting my door casings up and getting the first three bedroom doors up.

Well, I'm pleased to announce that I finished the remainder of the interior doors. My bathroom has new door (YAY!) as well as my coat closet and pantry. My turn around on these doors was much quicker. Mostly because showering with a sheet for a door was quite chilly. I've also got most of the casings up around the doors. The only four I have left are the inside of the bedrooms/bathrooms. It really has made such a big difference in starting the "finished look" that I want to have.

Front door and closet before the casings.

After the casings and new closet door are up.


Pantry with the casings, but before the door.


Pantry with casings and door. Got to admit, it's really nice not having all my food on display all the time.

This was sort of a finishing up of some other posts. I still have a few more casings left, but all the interior doors should now be taken care of. Reba was super helpful in this project. I also quit using paintable caulk for my nail holes and opted for white nail filler. Works MUCH better.

To showers without the draft,

Boomba

Thursday, August 4, 2011

Meet Reba....

Be nice everyone! Say hello to one of my BFF's :)


Reba is my Porter Cable pancake compressor with three (yes 3!) attachments. I have a stapler, nail gun, and finishing nail gun. I got her as a Christmas present from my Dad, which meant that I finally returned the compressor I had borrowed for over a year. (Thanks Jack!)

Over the past six months I HAVE been working on the house. I just haven't been blogging about it because I'm a failure. Here I am, starting my process of catching everyone up. During my recent projects, Reba has played an integral roll in their completions. Don't know where I'd be without her!

So.... the question I'm sure some of you are curious to know.... Why do I call her Reba? It was a rather easy name to come up with:

1-She's really red
2-When she "sings" I wear earplugs

:)

Sorry to all the Reba fans out there... I don't mind her songs really, but she's one of my least favorite country artists. I'm no expert on the genre and I'll be the first to admit it. However, I do love MY Reba.

To red heads that pack some heat,

Boomba